Showing posts with label Recipes. Show all posts

Wednesday, March 2, 2011

Cookin by the book...

...or by the magazine actually! This week I was looking for a little guidance when planning our meals so I decided to pull out an old edition of Clean Eating Magazine (May/June 2010) and check out their budget recipes sections. This section provide five meals with recipes and even a shopping list!

First up this week was Chicken Pomodoro...


It actually came out pretty good. I made a few adjustments to the recipe, but overall it came out the same. I also went with whole wheat fettucini noodles that we had on hand. Most of the recipes in Cleaning Eating's budget plans are set for four or more serving so that means it ends up being lunch the next day- BONUS!!!

Last night I cooked up a little bit of New Orleans in the kitchen with Creole Dirty Rice.

I even used dried kidney beans this time. I have a tendency to lean towards the canned version of beans because it is just more convenient, but since I really wanted to follow the recipe I did it as instructed and it wasn't too bad it just required some overnight soaking.

Personally I thought it could have used a bit more of a kick, so I topped it with some hot sauce. I actually doubled this recipe so we had lunch today, and we still have plenty leftover for another meal.

Tonight was a night off from cooking to enjoy dinner with the girls. We try to find at least one day a month to get together, dine, and catch up. Tonight was sushi! I'm not up to eating the raw fish just yet, but I've moved from shrimp up to crab as of tonight.


It was a great night, but I'm still exhausted from the time zone change and I guess you could say it is my own fault since I refuse to slow down. Oh, and maybe because there is so much to catch up on both at home and at work!

Anyone make any good recipes lately? Please post a link.

Tuesday, January 25, 2011

Cookbook Challenge #3

This weekend was crazy so I wasn't sure that I was going to get to the cookbook challenge, but on Sunday I took a look through the next cookbook in the line-up. I easily found a recipe that intrigued me and one that I had most of the ingredients for.

The Cookbook- Moosewood Restaurant: New Classics
This cookbook was a freebie my husband received from a co-worker that was clearing off her bookshelves. Moosewood Restaurant is located in Ithaca, NY and this cookbook was full of appealing recipes that will definitely be considered in future cookbook challenges.


The Recipe:


I chose this recipe because I've never made biscotti, I had most of the ingredients, and I love chocolate (who doesn't?). I made a few small substitutions on this recipe because it was far to cold to run to the store: I used craisins instead of dried cherries, white chocolate chips instead of regular chocolate chips, and vanilla extract instead of vanilla & almond.

I followed the recipe and combined all ingredients, and then formed a "loaf" with the dough that I molded until it was approximately one inch high, four inches wide, and fourteen inches long. I baked it as a "loaf", as instructed.


After it came out of the oven it cooled a bit before Matt sliced it to resemble the typical biscotti form. The sliced biscotti was then baked for a few more minutes on each side to create the crisp crunch we all know and love.


After all the baking and awesome smells filling the house our final product was pretty impressive for a first shot at biscotti. If I had been really ambitious they would have gotten dipped in chocolate, but after tasting them I decided they were perfect the way Moosewood Restaurant intended them to be!


What did you cook this weekend? Do you have any recipes planned for this week?

Tuesday, January 11, 2011

A Cookie for Me and A Cookie for You

To be honest I was just being lazy tonight, but my friend Katie just sent a request through the comment section on the last post:

Katie said...
Jen, I've been trying to find that cookie recipe that I asked you for, but I cannot find it. One of my students just finally passed his first test all year! So, I promised him some cookies if he passed, so now I have to follow through!

My Response...
Katie, after he tastes these cookies he might try to find a way into your class next year just so he can get more cookies- just saying!

I also think making these cookies might just get her selected for teacher of the year! My teachers never baked for me when I passed a test!


For the rest of you that didn't get a taste of my newest cookies, they are basically stuff chocolate chip cookies. They can be stuffed with a brownie (the original), peanut butter cups, rolos, or anything else you want to try to hide inside. Doesn't that sound good?

So without further ramblings here it is:

Treasure Cookies
(adapted slightly from Bakerella)

1 cup butter, room temperature
1 1/2 cups packed light brown sugar
2 large eggs, plus 1 egg yolk
1 tablespoon vanilla

2 1/2 cups all purpose flour
2 teaspoons baking powder
1/2 teaspoon salt
1/2 teaspoon baking soda

12 oz. bag miniature semi-sweet chocolate chips

To make your dough:
Beat the butter with a mixer until creamy, then add brown sugar and beat again.
Add your eggs, yolk and vanilla and beat until smooth.

In a separate bowl combine flour, baking powder, soda and salt and stir together.

Next, if you're lucky enough to own a Kitchen-Aid Mixer slowly mix the flour into the wet ingredients until combined. But if you're like me and like to add love your baked goods, slowly stir the flour in by hand with a good sturdy Scopula. (Toward the end of mixing it will get a bit sticky, but hang in there and keep adding love!)

Once it's all combined add in your mini chips. (Note: I actually never used a full bag, but you make that decision as you go.)

Next take a break for yourself and let the dough set in the fridge, it makes the cookie flavors really come together and will make it easier to deal with. I left it in the fridge overnight, but you might only be able to make it an hour!

When you can't resist any longer, preheat your oven to 350 degrees and be prepared to get a little messy.

Using a spoon take a little more than a tablespoon of dough, make a little patty (not too thin!), and place it on a lightly greased cookie sheet. Do this only six times per baking sheet, and trust me here because these cookies grow when baked.

On your little patty place your treat. The candies are easiest to work with, but if you're using brownies go with a batch of brownies that you prepare ahead of time. Take a small chunk of brownie, create smaller patty, and place it on your cookies patty.

Next you will need to top each of your cookie/treats patties with a dome of cookie dough. It is key to cover completely, and again don't go too thin because the cookies will bake down and out.

Place in your preheated oven for 15-18 minutes. You'll know they're done when they are slightly browned around the edges. Remove from the oven and let them sit for approximately 5 minutes before moving to a cooling rack. Repeat until the dough is gone.

And there you have it! It's a bit long winded and sounds like a lot of work, but I assure it isn't as bad as it sounds. I can also promise you that it is worth the effort.

These are big crowd pleasers so bring them to your next gathering or potluck!

Thursday, January 6, 2011

Lentil soup for the soul...

It was a balmy 50 degrees last week for New Years, by Sunday it was back in the 20's and snowy- gotta love 30 degree drops in temperature! Anyways now that the temperatures are back to normal and there is snow on the ground once again, I decided it was time for some soup.

I had veggies left over from New Years and lentils in the cupboard so I decide to whip up some soup last night. I chopped up some carrots, celery (don't tell my husband), red onion, and garlic then sauteed them in a little olive oil to soften them.

(Yes that onion is sprouting!! Must be too hot in my cupboard.)

While the veggies cooked down a bit and filled the house with their tasty aroma, I measured out some some lentils. I decided to go with part green and part red for a bit of variety.


After adding the 1.5 cups of lentils to the pot, I added about 5 cups of liquid. I used about 2 cups of stock and 3 cups of water. Next time I'd use just stock, but I ran out so I had to be flexible. For purposes of seasoning you can add a bay leaf or two, and anything else that you like. I added some hot sauce because I wanted a bit of kick in my lentils.

Then let it cook for about 30 minutes, stirring occasionally. Once the lentils are tender and tasty, serve up with a dollop of Greek yogurt.


Lentil Soup

1 cup carrots, diced
1/2 cup celery, diced
1 small onion, diced
2 cloves garlic, minced
1 1/2 cups lentils, any type
5 cups of stock and/or water
2 bay leaves (don't eat)
Hot Sauce to Taste

Saute the first four ingredients in a little olive oil in the bottom of your stock pot until soften, and be careful not to burn. Then add in your lentils, stock and/or water, and bay leaves. This would also be the time to add any additional seasonings you'd like. Simmer approximately 60 minutes, stirring occasionally until lentils are softened. Serve and enjoy!

What is your favorite meal to warm up with?

This land is your land and this land is my land,
From California to the New York Island,
From the Redwood Forest to the Gulf Stream waters,
This land was made for you and me.

-This Land is Your Land, Woody Guthrie


(Yeah I know totally random song that reminds me of elementary school, but it's been stuck in my head all day!)

Wednesday, September 8, 2010

Black Beans + Spices = Yummy Burgers!

Okay I must confess I had intentions to go to the grocery store Tuesday night, but never got there. I even went through the trouble of creating a list, but once the rain started pouring down I changed plans.

So now I've had to re-think the whole week of food because the week is almost over so there is very little reason to do a full out shopping trip. I stopped at the store on my way home from the gym tonight. My reduced shopping list came to just under $30- sounds like a good week for me!

So for tonight I've decided to prepare black bean burgers because I have the items on hand- and because I've been meaning to get the recipe to Sabrina!

So here goes... black bean burgers with sweet potato fries.


Black Bean Burger Recipe

1 medium onion, diced
2 cloves garlic, finely diced
2 tsp chili powder
2 tsp paprika
1 tsp red pepper flakes
1 tsp cumin
3/4 cup walnuts
1 can black beans (drain & rinse)
1/4 cup salsa
1/4 cup corn
3/4 cup bread crumbs
1 Tbsp ground flax + 3 tbsp water, whisked

1. Preheat oven to 425*.

2. Whisk ground flax and water together in small bowl and allow to sit until used. (This replaces 1 egg for a vegan burger.)

3. Saute the onion and garlic in 2 tablespoons of olive oil. After about 3 minutes add in the chili powder, paprika, cumin and red pepper flakes.

4. Place the walnuts in a food processor, and pulse until coarsely chopped. Add the black beans, salsa, corn, bread crumbs, "egg" mixture from step 2, and onion mixture from step 3. Process until the mixture forms a paste- then add salt & pepper to taste.

5. Allow mixture to sit for approximately 10 minutes, then form six patties. Patties should be cooked on an oiled baking sheet, with the tops of the patties also brushed with olive oil.

6. Bake 15 minutes, then flip and cook 10 more minutes.

7. Remove from oven and enjoy!

I must warn you though that the burgers came out looking good, this recipe may need a little more adjustment to make them easier to handle. They are a bit soft, and have too much moisture. I would still say to give them a shot because they are super yummy!

What did you have for dinner tonight?

Thursday, September 2, 2010

It's getting crazy....

Matt is very busy in the kitchen. He's taking charge of the meal planning for the next few days, and he is doing lots of prep work. I went in briefly to get some water- there he was chopping, packaging, and labeling lots of goodies. I'm excited to see what the next few days bring...

I used the iPhone to snap a photo of my stuff peppers from last night!


It's a Stuffed Pepper, and it's organic (bonus!). Matt's mom gave us these peppers last weekend so I used them to create a protein stuffed pepper.

Protein Filled Peppers

What you'll need:
1 small onion
1 clove garlic
2 cups spinach
1 can black beans (rinsed and drained)
1 tbsp cumin
1 tsp cayenne (if you like it hot!)
1 cup tomato sauce of your choice
1 cup quinoa (dry)
2 cups water

2 bell peppers (any color)

How to do it:

1- Cook the quinoa in the 2 cups of water.
2- Meanwhile in a pan saute the onion, garlic, and spinch in a little olive oil.
3- When the spinach has cooked down add the remaining ingredients, then the cooked quinoa. Mix it all up.
4- Cut the two bell pepper in half, removing the ribs and seeds. Then stuff them full of your awesome mixture.
5- Bake at 375* for about 30 minutes.

Enjoy!

(The blog just better with pictures- don't you agree?)

Thursday, August 19, 2010

Italian Squash...

I knew tonight was going to be spent preparing for our upcoming yard sale, so I planned ahead and prepped dinner before Matt got home. Earlier today I was trying to think about what I could make that would be tasty, healthy, and fresh. I decided to base the meal around the yellow and green squash I had on hand. And I decided I'd invent an Italian Squash Casserole.

Italian Squash Casserole
1/2 purple onion
2 cloves of garlic (we love garlic)
1/2 pound of ground turkey
1 yellow squash
1 green squash
1 tablespoon basil
1 tablespoon oregano
Black Pepper
1 1/2 cups tomato sauce (no added sugar!!!)

Start by chopping the onion and garlic then saute in a skillet with a little olive oil. Next add the ground turkey and cook through. Chop the squash in larger chunks then add to skillet along with the basil, oregano and black pepper. Allow the mixture to cook through until the squash is tender.


Add the tomato sauce and mix.


You can enjoy it at this point, but I took it a step further. I placed it in a oven safe dish, then when we were ready to eat topped it with homemade bread crumbs and a little Parmesan cheese. It was baked at 375* for 15 minutes, then broiled on high for 5 minutes.


Does this is not look yummy????


Matt loved it and was surprised to find meat in our meal tonight, guess I've been cooking too much vegetarian??? I think not, we actually have a pretty good balance.

Alright off to get some sleep- tomorrow is going to be a long day with work, final yard sale prep, and I'm also working on some cupcakes for a bachelorette party.

Thursday, February 25, 2010

Meal Planning...

Ever since Matt & I began our transition to a healthy lifestyle we have been meal planning. Each week I will lay out each meal for the week, which includes not only the core meals but also daily snacks.

For the last 7 weeks we have been doing things slightly different. Matt has his muscle building meal plan, which includes a higher number of calories and more protein. And I have a seperate plan that follow along with my food buddy, Sabrina.

Each week I pick at least 5 different main meals, 2 types of snacks, and a main breakfast. The main meals are then used to cover either a lunch or a dinner. And to make life even easier one of us will handle two meals and snack, while the other make the other three meals. On Sunday we meet up and swap food, and we're instantly prepared for the week. How great does that sound?

Here's a sample of what next week looks like:

Sunday
Breakfast: Ezekiel Cereal w/ dried fruit & almond milk
Snack 1: Breakfast Cake
Lunch: Leftovers from prior week
Snack 2: Apple w/ Peanut Butter
Dinner: Pork Tenderloin w/ Broccoli

Monday
Breakfast: Ezekiel Cereal w/ dried fruit & almond milk
Snack 1: Breakfast Cake
Lunch: Chicken Tex-Mex
Snack 2: Stonyfield Yogurt
Dinner: Chicken Sausage w/ Sweet Potato

Tuesday
Breakfast: Ezekiel Cereal w/ dried fruit & almond milk
Snack 1: Breakfast Cake
Lunch: Chili Mac & Cheese
Snack 2: Stonyfield Yogurt
Dinner: Pork Stir-Fry w/ Brown Rice

Wednesday
Breakfast: Ezekiel Cereal w/ dried fruit & almond milk
Snack 1: Breakfast Cake
Lunch: Pork Tenderloin w/ Broccoli
Snack 2: Stonyfield Yogurt
Dinner: Chicken Tex-Mex

Thursday
Breakfast: Ezekiel Cereal w/ dried fruit & almond milk
Snack 1: Breakfast Cake
Lunch: Chicken Sausage w/ Sweet Potato
Snack 2: Stonyfield Yogurt
Dinner: Chili Mac & Cheese

Friday
Breakfast: Ezekiel Cereal w/ dried fruit & almond milk
Snack 1: Breakfast Cake
Lunch: Pork Stir-Fry for Sabrina- Jen can't eat meat
Snack 2: Stonyfield Yogurt
Dinner: Tilapia w/ Veggies

Saturday
Breakfast: Ezekiel Cereal w/ dried fruit & almond milk
Snack 1: Breakfast Cake
Lunch: Chili Mac & Cheese
Snack 2: Stonyfield Yogurt
Dinner: Free Choice

That's the plan, don't worry pictures and recipes to come during the week after the food has been made.

Now I challenge you to plan your week of meals.

Sunday, February 14, 2010

Valentine's Day Treats...

We don't celebrate Valentine Day the commercial way, so no overpriced flowers or heart shaped boxes of chocolates in this house. Instead we had a typical Sunday, with two new recipes- one for breakfast and one for dinner.

Breakfast:


Healthy whole wheat pancakes with peanut butter swirl, topped with walnuts and coconut. Don't they look so yummy. Matt loved them. And they didn't even need to have syrup but I used a little agave.

I gotta the recipe from Oh She Glows, she always has great recipes on her site.


Dinner:

Yes, that is deep dish pizza!


It's from the Eat Clean Magazine this month. Loaded with veggies and leftover turkey burger- awesome stuff.

And last but not least: A surprise dessert from my husband.


Is that not the most beautiful treat?!? I've been craving a brownie sundae and boy did he deliver! If you ask me this is the perfect way to celebrate Valentine's Day.

Hope everyone had a great day!

Thursday, February 11, 2010

Thursday's Experiment

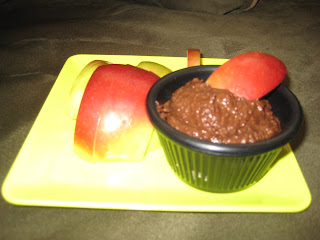
Today I tried a new experiment. This time I used chickpeas to create chocolate hummus. I know you're probably thinking that sounds weird, but I swear I saw it in a magazine. There is a company who makes it, packages it, and sells it. So I thought I should try to create it myself- I've gotta a least try it before I judge it.

So with my last can of chickpeas I created what turned out to be a nice chocolate treat to go with my apples. Doesn't it look yummy?


If you're looking to recreate this masterpiece, here's how I created it.

1 can chickpeas (drained and rinsed)
1/4 cup peanut butter
2 tbsp of olive oil
1/2 cup carob powder (or cocoa powder)
1/2 cup sucanat (or sugar)
1 tsp vanilla
2-4 tbsp water

Place all ingredients in a food processor, except water. Pulse the processor adding water as needed to create a 'smooth' chocolate mixture. I recommend scrapping the sides at least once. Note: it will not be smooth like peanut butter, but it shouldn't be chunky either.

Serve with apples, banana, graham cracker, or anything you want really. Give it a try you just might like it!

Have a tasty Thursday!

Sunday, February 7, 2010

Black Beans...


Black beans are a great source of protein, fiber, and iron. These beans provide many benefits and can be used in many ways. You can add black beans to your tacos, create a yummy soup, make burgers, and even bake some brownies. We buy them in bulk, I think right now we have at least six cans in the cupboard, plus I used four cans earlier today. There is no shortage of protein in this house!

Earlier today I needed a quick lunch/snack so I took some leftover peppers and onions, half a can of black beans, and some spinach to create a tasty wrap. Add some salsa and it tastes just like a taco. I wasn't thinking about pictures at the time so you'll just have to use your imagination.

For dinner tonight (and lunch later this week), I created some black bean soup. It is filling and very tasty. I got the recipe off the Internet, but it is 90% black beans and 10% seasonings. It couldn't be easier!


For dessert tonight I had one of the 'Black Bean Fudge Cakes', aka brownies, we made earlier this week. I found the recipe in the latest edition of Clean Eating Magazine, you will enjoy it too!

Black Bean Fudge Cakes
1oz dark organic chocolate
1.5 cups soft-cooked black beans, rinsed and drained
2 eggs
1 egg white
2 tbsp olive oil
1/4 heaped cup unsweetened cocoa (or carob) powder
1 tsp baking powder
1 tsp pure vanilla extract
1/4 cup unsweetened applesauce
1/2 cup raw organic honey (my favorite!!!)
1/4 to 1/2 cups unsalted walnuts, chopped

Step 1: Preheat over to 350 degrees. Mist 8 inch baking dish with cooking spray.

Step 2: Melt dark chocolate in a small saucepan over low heat with 1 tbsp water mixed in.

Step 3: Combine melted chocolate, beans, eggs, egg white, oil, cocoa powder, baking powder, vanilla, applesauce and honey in a food processor; process until smooth. Stir in walnuts and pour mixture into the baking dish.

Step 4: Bake in preheated oven until the top is dry and the edges start to pull away from the sides, about 30 minutes.

Remember although these are made with black beans, they still have calories. They are a treat to enjoy occasionally- not all day everyday.

And check out this recipe and many more in the latest Clean Eating:

Friday, February 5, 2010

Matt+Jen+Recipes=Success

Here's a look at what we've been making over the last two days....


First creation was brownies, but these aren't your typical out of the box type. The recipe calls them Black Bean Fudge Cakes- yes black beans! The recipe was created to be gluten free and satisfy a chocolate craving. I can tell you that these brownies are very good, and you can't even taste the black beans. My friends and family will be seeing this dessert at gatherings, but I don't think they'll know about the black beans.


Next up was Sprouted Brown Bread. This is a raw recipe suggested by Grandma Langton. Matt soaked wheat berries until they sprouted a half inch, put the sprouted grain in the food processor until it looked like bread dough, then placed it in Pyrex dish in the slow cooker overnight (8 hours). Matt was pleased with the results- the bread had a hard crust, but the inside was soft with a slightly sweet taste (possibly attributed the natural sugars). Will we try this again? Yes, definitely.

Sprouted Wheat Berries...


A close-up...


Becoming bread...


The finished product...


Last was the traditional Chocolate Chip Cookie. If you know me, you've probably had one of these yummy treats. Let me tell you it is hard to sit here and not eat them, they smell so good! They are for the guys at the VW dealership- yes I make my car people cookies. It sounds crazy but they appreciate it and they definitely know who I am!


Stay tuned for some dehydrator experiments in the next week or so. It hasn't arrived yet, but should be here soon. We're super excited!